This tool is intended for debugging and testing of TR module applications communicating using IQRF DPA protocol.
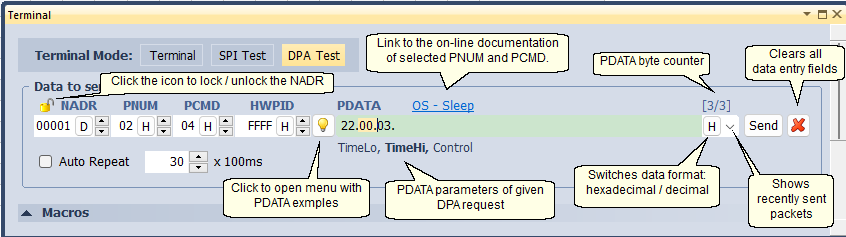
The functionality is the same like in the Terminal mode. In addition there are fields for DPA packet header entering (NADR, PNUM, PCMD, HWPID).
The DPA Test can be used also for a communication with a DPA device in DPA Service Mode or DPA Peer-to-Peer using the CATS.
•Terminal Mode
Switching among the Terminal, SPI Test and DPA Test modes.
•Auto Repeat
Activates automatic sending of data in preselected period. The range depends on the communication channel.
USB |
1 - 36000 => 100 ms - 1 h |
IQRF Cloud |
1 - 36000 => 10 s - 100 h |
By clicking the arrow control components for this function are shown.
When working with macros, it can be useful to lock the address NADR by clicking the lock icon, see the picture above. If NADR is locked its address stays unchanged when macros are selected. If unlocked, the NADR value is set according the macro selected.
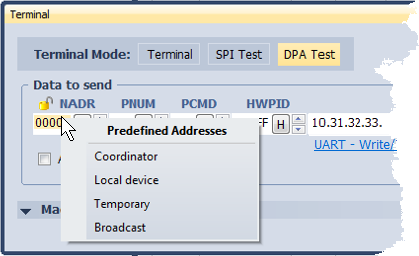
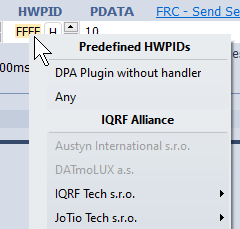
•By clicking the right mouse button to the NADR, PNUM, PCMD or HWPID entry field the Predefined Addresses, Predefined Peripherals, Predefined Commands or Predefined HWPIDs menu is shown. These menus offers items defined in the DPA specification and on the IQRF Repository.
oThe disabled HWPID menu item means that the manufacturer is registered but no its product is defined as a standardized.
•Click the bulb icon to open a menu with PDATA examples.
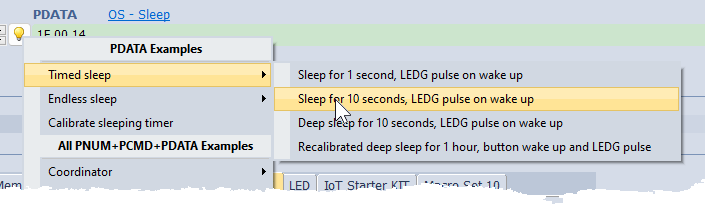
oThe menu contains useful PDATA parameters for the currently selected PNUM and PCMD. It also contains All PNUM+PCMD+PDATA Examples to quickly create a DPA request without a need to select PNUM and PCMD separately. All examples are defined in the IQRF Repository.
oClick the list item to set a packet to the Data to send fields.
oPress the Ctrl key and click the list item to send the packet. The packet is also set to the Data to send fields.
oThe icon color indicates following:
▪![]() The menu contains some example for the currently selected PNUM and PCMD.
The menu contains some example for the currently selected PNUM and PCMD.
▪![]() No example is available in the menu for the currently selected PNUM and PCMD.
No example is available in the menu for the currently selected PNUM and PCMD.
▪![]() No example is available in the menu for the currently used DPA version.
No example is available in the menu for the currently used DPA version.
oSome examples contain NADR indications using colored dots. The meaning is described here.

•DPA Request assistant shows required PDATA parameters and helps with entering the correct number of PDATA bytes (for DPA 4.00 or higher).
oIf the given DPA Request does not require any data, it is indicated by the text "Not used":

However, it is still possible to enter some data e.g. for testing purposes. This data will be indicated in red.
oDuring byte writing, the PDATA field is white and the corresponding parameter is highlighted. Square brackets on the right indicate an incorrect number of bytes in red:

oThe correct number of bytes is indicated in green:

oToo many bytes is indicated in red:

oClick on the parameter to mark the corresponding bytes:

oIf PDATA contains multiple identical parameter sections, click the parameter repeatedly to highlight the corresponding byte in each section in turn:

oClick on the byte to highlight the corresponding parameter:

•By clicking the right mouse button to the PDATA entry field the menu is shown.
▪Clear Ctrl+D
Clears given data entry field.
oCut Ctrl+X
Removes selected data and puts it to the Windows clipboard.
oCopy Ctrl+C
Copies selected data to the Windows clipboard.
oPaste Ctrl+V
Puts data from the Windows clipboard.
oSelect All Ctrl+A
Selects (highlights) content of given data entry field.
oClear History
Clears history of recently sent packets.
•Data can be selected (highlighted) also by a mouse.
•It is possible to move through the PDATA entry field using keys:
oHome, End
oCtrl+Right Arrow, Ctrl+Left Arrow (shift by bytes)
•If the value of the NADR, PNUM, PCMD or HWPID is out of range it is indicated by red color.
![]()