•This tab allows to upgrade/downgrade the Coordinator or Nodes via IQMESH network - Over The Air (OTA) upload. Supported files:
oCustom DPA Handler (.HEX)
oPlug-in (.IQRF)
oIQRF OS and DPA change (.BIN)
oExternal MCU FW (HEX)
•Supports TR-7xD modules with IQRF OS 3.08D or higher.
•Supports DPA 2.26 or higher.
•Procedure (for relating information see. IQRF DPA Framework Technical guide, chapter: DPA in Practice / Code Upload):
oUpload a selected file to the temporary memory.
oVerify the checksum.
oLoad data to the Flash memory.
Target device selection. It is allowed to upload the selected file to the Coordinator, a selected Node or to all/more Nodes according to the HWPID. The All Nodes destination cannot be used for the External MCU FW.

Uploaded file selection. A file from the Project window or from the PC storage can be selected.
In case of IQRF OS and DPA change file (.BIN) it is recommended to use the OTA Upload Assistant by the Assistant button (supported from IQRF OS 4.03D and DPA 4.13). This assistant allows selection from available files from the IQRF Repository according to the IQRF OS and DPA versions of the connected Coordinator or selected Node. Detailed procedure of the OTA change of IQRF OS and DPA is described here.

After selection the file type, length and checksum of uploaded data is automatically calculated.and displayed in the Upload section below. If the external EEPROM already contains some file data (only the Load will be executed), the Source File check box must be unchecked.
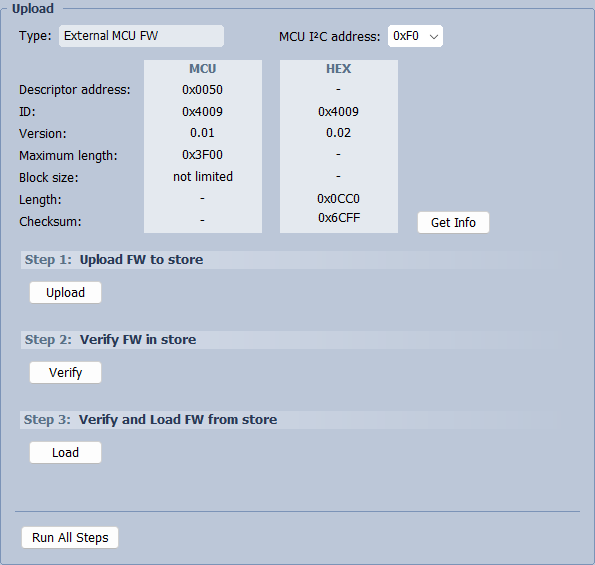
In case of the External MCU FW, the detailed FW information is displayed by clicking the Get Info button in the Upload section below.
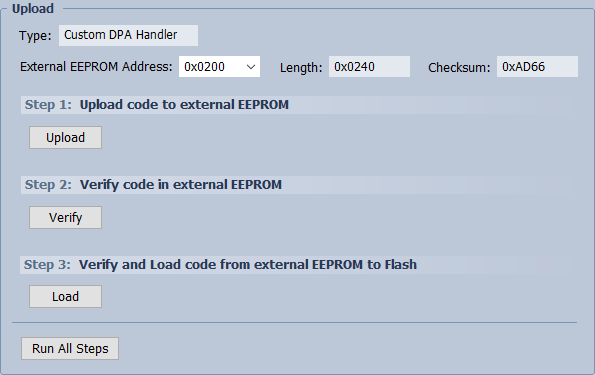
oFor all file types except the External MCU FW:
▪If the file was selected in the Source File section above the file type, length and checksum of data is set automatically. Only the address in external EEPROM (multiple of 64) where the data should be stored must be set. This address should be chosen according to the free memory space (Coordinator, Autoexec, IO Setup, application data, ...). If there is a need only to store data for later usage it is needed to make a note: file type, external EEPROM address, length and checksum of data (a record from the Output window can be used). Then use steps 1 (Upload) and 2 (Verify). The upgrade/downgrade is done by step 3 (Load).
▪If the external EEPROM already contains some file data (e.g. more Custom DPA Handlers) the file type, external EEPROM address (multiple of 64), length (multiple of 64) and checksum must be set. The upgrade/downgrade is done by step 3 (Load).
oFor External MCU FW file type:
▪Click the Get Info button to display FW information:
❑ From the destination device (must be available)
❑ From the selected HEX file
oStep 1: Upload Uploads selected file to the temporary memory of selected device/devices.
oStep 2: Verify Verifies data consistency and checksum.
oStep 3: Load Verifies data consistency and checksum and if everything is correct loads data to the Flash memory.
|
|
|
oRun All Steps (Shift+F5)
Executes all 3 steps described above on one click.
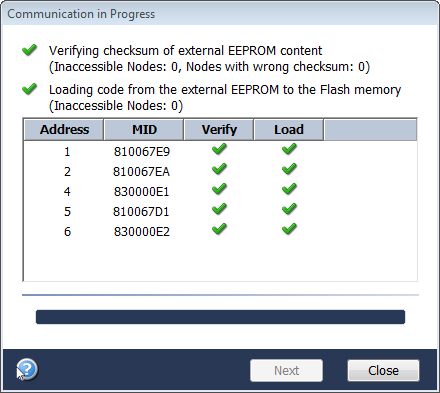
oIf the verifying or loading is done on more Nodes the result is displayed in the following table:


